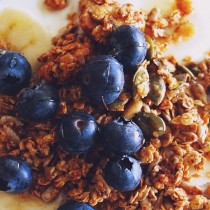
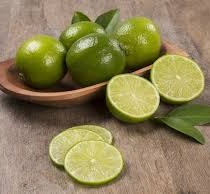
Feeds:
Posts
Comments

A few weeks ago I did my FIRST EVER guest post!!!  I was so excited when I saw on twitter that Lindsay from The Lean Green Blog was looking for guest bloggers over the holidays.  Ofcourse, in my typical overly excited fashion, I shot Lindsay a tweet back to sign me up!!!  Linsday’s blog is a good mix of everyday health and fitness, along with recipes to keep you on track.  I wanted to share something that was more on the healthy side to stick with her theme.  These Chipotle & Rosemary Spiced Nuts were perfect.  They are a great combo of sweet, savory, and spicy and would make a great addition to your Super Bowl Party menu (aka…they go great with a lager!).

Head over to Lindsay’s blog for the recipe and some more pics!

HAPPY (belated) NEW YEAR!!!!  

I know it’s been some time since my last post and I apologize.  I took some time off during the holidays to spend with family and travel Ohio for Christmas gatherings and a baby shower.  When we got back I was totally exhausted getting back into the work week that I took a bit longer than expected off from the blog.  I hope you all had a wonderful holiday season and are looking forward to 2012 as much as we are!

While I was home we spent many hours in the kitchen!  I love baking and cooking with my family!  It’s always fun and I always guarantee to make a mess.  I felt so bad for my parent’s carpet.  I bet there is dried batter in more places than they care to know about.  Oops!  On the menu Christmas morning was this Pear Spice Cake I found over on Joy’s blog.  I love spice cake and knew that a pear one would make a perfect treat on that special day.

Original plan was to eat around 11:30am.  Well, an hour and a half past that we were finally sitting down.  The prep work turned out to be a bit more involved than I originally planned, or maybe it was because I was simply enjoying making it and not rushing through the steps.  Regardless, this spice cake is well worth it!  It was AMAZING!!!  Perfect flavor, texture, spice, and the praline topping was pure heaven!  The idea of turning this into a repeat Christmas cake was not only mentioned, but I’m pretty sure demanded.  This would make a great addition to any brunch menu, holidays or not.  Did I happen to mention it reheats very well…added bonus!!

(Printable Recipe)

Pear Spice Cake with Walnut Praline Topping

Recipe from Joy the Baker

Pear Spice Cake Ingredients

  • 2 cups all-purpose flour
  • 1 1/2 tsp ground cinnamon
  • 1 1/2 tsp ground allspice
  • 1 1/2 tsp ground nutmeg
  • 1 tsp baking soda
  • 1 tsp baking powder
  • 1/2 tsp salt
  • 2 sticks (1 cup) unsalted butter, room temperature
  • 1 cup sugar
  • 3 large eggs, separated and at room temperature
  • 1 tsp vanilla extract
  • 1 cup buttermilk
  • 3 pears, peeled, cored, and diced into 1/2-inch pieces (about 1 to 1 1/4 cups)
  • 3/4 – 1 cup walnuts, toasted, cooled, and finely chopped

Walnut Praline Topping

  • 3/4 cup packed light brown sugar
  • 1/2 cup butter
  • 1/4 cup whipping cream
  • 1/2 cup walnuts, toasted and roughly chopped

Pear Spice Cake Directions

1.  Make sure rack is in the middle position and preheat oven to 350 degrees.  Butter and flour bundt pan.  Set aside.

2.  In a medium bowl, whisk together flour, baking soda, baking powder, and salt.  Set aside.

3.  In a large bowl, beat together butter, sugar, cinnamon, allspice, and nutmeg with an electric mixer at medium-high speed until fluffy, about 4-5 minutes for a hand mixer and about 3 minutes in a stand mixer.  Be sure to scrape the bowl every few minutes.  Add yolks 1 at a time, beating well after each addition.  Beat in vanilla extract.  Reduce speed to low, add flour mixture and buttermilk in alternating batches, starting and ending with the flour mixture.  Mix well after each addition.  Fold in pear pieces and chopped walnuts.

4.  In a separate bowl with cleaned beaters, beat egg whites until they just hold stiff peaks.  Gently fold whites into batter until fully combined.

5.  Spoon batter into prepared bundt pan, smoothing top, and bake until a wooden pick or skewer comes out clean, 40 to 50 minutes.  Cool cake in pan on wire rack for 10 minutes.  If serving warm, start walnut praline topping while cake is cooling.  Invert onto rack to cool.

Walnut Praline Topping Directions

1.  In a medium saucepan, combine brown sugar, whipping cream and 1/2 cup butter over medium-high heat until smooth.  Boil for 3 minutes, stirring often.  Stir in walnut pieces.  Spoon warm topping over cake.

Notes:

  • I reduced the amount of walnuts in both the cake and topping due to personal preference.  
  • When topping is first placed over cake it will run down the sides, this is ok.  It forms a wonderful pool in the middle that is absolutely divine.  If you prefer to have more topping on the cake itself, allow topping to cool slightly before spreading on cake.  Next time I think I will let it cool for a bit.  
  • This cake is delicious with pear, but would also be good with apple pieces as well.

Caramel Party Mix

I am sooo excited to share this recipe with you guys!!  Not only is it AMAZING but it’s a family recipe!  We make it every year for the holidays, a family tradition for sure.  I always remember my mom making it once the holiday season was in full swing.  She would have a bowl with her morning coffee and perhaps a handful after dinner.  About 5 or so years ago I started making it as well because there was no way I could wait until Christmas week to partake.  There are many ways I follow in my mom’s footsteps and this is no exception.  Piping hot coffee in one hand, small bowl of caramel party mix in the other.  Life is good!

This caramely mix has made an appearance at numerous holiday parties and been given as countless homemade gifts.  It’s always a hit!!  I like to think the obsession goes somewhat like this for a newbie:  ”Caramel Party Mix…hmm…sounds pretty good.  First few pieces are consumed, this stuff is GOOD!  Another few pieces maybe even a handful later, what is this??  It’s so addicting!  Email is composed and the recipe is requested!”  2 years ago I made it for some co-workers and got a request from them the next year to have another bag, and if I could make that bag bigger than last year that would be great!

Enough talking it up….what does it taste like?!?  Well……it’s sweet and caramely and crunchy and addicting!!!  Soo addicting!  Don’t be turned away by the hour baking time.  It’s well worth the every -15-minute stirring process.  If you have some left over cereal from making salty party mix, give this one a try!  You will be hooked.  Coffee drinker?  Start your morning off right and add this to your pre-breakfast roundup.  It’s especially yummy sitting in front of a fire on a crisp winter morning.   Not that it changes the taste, but it creates a relaxing picture, doesn’t it??  I hope you enjoy this sweet treat as much as we do!!

(Printable Recipe)

Caramel Party Mix

Ingredients

  • 10 cups cereal (cereal recommendations listed below)
  • 1 cup brown sugar
  • 1 stick butter, unsalted
  • 1/3 cup light Karo syrup
  • 1/4 tsp vanilla extract
  • 1/2 tsp baking soda
Cereal Recommendations
  • 2 cups rice chex
  • 2 cups corn chex
  • 2 cups bugels
  • 1 cup kix cereal
  • 1 cup cheerios
  • 1 overflowing cup of pretzels
  • 1 cup peanuts OR you can do 1/2 peanuts 1/2 cashews

Directions

1.  Preheat oven to 200 degrees.  Place cereal in a large foil pan.  Set aside.

2.  In a large saucepan, combine butter, brown sugar, light corn syrup and vanilla extract over medium-low heat.  Stir frequently until butter is melted and mixture is combined.  Allow mixture to come to a rolling boil, allow to boil for 45 seconds to 1 minute.  Remove pan from heat and add baking soda.  Stir quickly to combine, the mixture will expand which is what you want.  Pour caramel mixture over cereal.  Stir cereal and caramel until well combined.

3.  Bake  for 1 hour, stirring every 15 minutes.  Allow to cool.  Store in an airtight container.


Notes:

  • I use a turkey roaster pan to make the party mix in.  You can find foil ones at Wal-Mart for about $1.  The nice thing about the foil pans, they are disposable.  It looks similar to this. 
  • While cooling, stir occasionally to make sure mix doesn’t stick to pan.  
  • Sample Often!  

Did I get your attention??!?

A reader informed me tonight that the amount of salt in the Peppermint Mocha Chocolate Chip Cookies was too high, and indeed it was.  I apologize to anyone that has made them already.  Luckily she said they still turned out really good but you could taste the salt.  Sorry.  :(

So….if you printed out that recipe already, change the salt to 1/4 tsp.  If you have not printed it out but this reminded you that you wanted to, no fear, it’s been updated in the printable link.  Print away!  :)

Apple Oatmeal Toffee Cookies

Aka….Cookie Failure!!  Do you guys remember my cookie failure rant from a few weeks ago??  Well I wish I was here to tell you that I conquered the thick, chewy oatmeal cookie that I had been longing for.  Unfortunately, I’ve tried 3 times since then and it’s still flat.  After my last attempt, I stomped around the kitchen, tossing my oven mitts, huffing and puffing about being defeated by a fricken’ cookie!  I was ticked!

After staring at rows of cookies that I deemed a failure, there was one thing that stayed constant this whole time.  The taste was sooo good!!  Too good, in fact, to be tossed to the wayside.  I “taste tested” 4 of them just to make sure.  Besides, who am I to judge this cookie just because it’s flatter than I was hoping.  Maybe you like a flat cookie and this is just what you are looking for.  This cookie is chewy, sweet, and piled high with all the flavors of the holiday season.  Just to recap:  we have a soft and chewy cookie with wonderful holiday flavor!  Yup…..no failure here!

One more week til Christmas!!  :)  How is everyone’s holiday baking and shopping coming along?

(Printable Recipe)

Apple Oatmeal Toffee Cookies

Recipe adapted from Sophistimom

Ingredients

  • 1 cup unbleached all-purpose flour
  • 1/2 tsp baking soda
  • 1/3 tsp salt
  • 1/2 tsp  ground cinnamon
  • 1/2 tsp ground nutmeg
  • 1 stick unsalted butter, room temperature
  • 1/2 cup brown sugar
  • 1/3 cup granulated sugar
  • 1 egg, room temperature
  • 1 tsp vanilla extract
  • 1 1/2 cup quick oats
  • 1 small apple, shredded and water drained (about 1/2 cup)
  • 1/4 cup Heath bits
  • 1/4 cup dried cranberries

Directions

1.  In a small bowl, whisk together flour, baking soda, salt, cinnamon and nutmeg.  Set aside.

2.  In a large bowl, beat butter and sugars together until light and fluffy, about 2 minutes.  Add egg and vanilla, beat until well incorporated.

3.  Reduce speed to low and slowly add in flour mixture.  Mix just until combined.  Add oatmeal, apple, heath bits, and cranberries and stir by hand until combined.  Cover dough with plastic wrap and refrigerate for at least an hour.

4.  (When ready to bake) Preheat oven to 350 degrees.  Line 2 baking sheets with parchment paper.  Using a medium scoop, place tablespoon size dough onto cookie sheets.  Bake for 12-15 minutes or until edges start to turn golden brown.  Remove from oven and allow to cool on pan for 5 minutes before transferring to a cooling rack.

Notes:

  • I tried the apples small diced, medium diced, and shredded and found that the shredded produced the best cookie.  
  • Watch your baking time.  Mine took about 12 minutes, sometimes  a little less.  Be sure to remove cookies when edges start to turn golden brown.


Are you chocolate and minted out yet?!?!  I hope not because this one is a doozy as well.  With that being said, I promise this is my last post about this delightful flavor combo.  Even I am getting a bit overwhelmed by the sugary goodness.   Stephanie from Life Taste Like Food asked me to participate in her Holiday Project a few months back.  I was so excited because it’s my first guest post EVER!!  Even more exciting was that Stephanie was the one who sent her yummy Gingerbread Cookies my way from the Cookie Swap!


Head over to Stephanie’s blog for all the details to create your very own tasty cupcake at home.  For the Mint Chocolate Chip Bark, click here.


Thanks so much Stephanie for having me participate in your Holiday Food round up!  Really enjoying all the new bloggers to follow and foods to check out.

This year I participated in a little something called The Great Food Blogger Cookie Swap hosted by the very talented Lindsay and Julie. Not sure if you heard of it or not, but it was pretty epic! There were some 22,000 cookies floating around the U.S. the past week just from this swap. I wonder how many cookies take flight or go on road trips this time of year?!? We were sent 3 fellow participants to send our cookies to and in return you received 3 dozen from various other people. The first dozen I received was Gingersnap Cookies with Chai drizzle and Candied Ginger from Stephanie of Life Tastes Like Food. Over the years I’ve developed a wonderful friendship with Ginger cookies. Back in the day we didn’t really see eye to eye, but as I matured so did my tastes buds. The first night I ate 3 of them, in like 10 minutes! Swoon!! They were delicious with my morning coffee. A few days later the next 2 dozen came. It was like Christmas!! Kimberly of Rhubarb & Honey sent Cranberry Orange Pecan Cookies that screamed of holiday scents. I loved the specs of orange zest…so festive!! Emily of A Gilt Nutmeg shared her Cookies and Cream Cookies that had big chunks of Oreo’s scattered throughout the cookie. Delish! I can’t wait to get the recipes from everyone and recreate them at home.

The cookie I shared with my matches was a spin off my favorite holiday pick-me-up….the one and only Peppermint Mocha Latte from Starbucks. I have now become one of those crazies in line that you always here people make fun of when ordering. Allow me to enlighten you…..”I’ll have a Grande Decaf Non-Fat No Whip 1/2 Pump Extra Hot Peppermint Mocha.” How many times do you think that’s actually the drink I end up with?? haha!!

Since I didn’t test the recipe before the exchange, I knew the base had to be one that I’ve used before. So I turned to my favorite chocolate cookie that appeared here and here. It’s part brownie, part cookie – kind of amazing! Added in some Andes Peppermint discs, mini chocolate chips, and crossed my fingers that it wasn’t too minty. I doubled the first batch and it made just enough to cover the 3 dozen that I needed. Which meant that I had to whip up some more to photograph, hate when that happens. 3 of them may have disappeared during the photo session….they just threw the picture way off balance. ;) I really hope everyone enjoyed these as much as I did! Are Peppermint Mocha Lattes one of your favorite holiday indulgences as well, try it in cookie form. I see nothing wrong with having them both in the same day either. Tis the season!

(Printable Recipe)

Peppermint Mocha Chocolate Chip Cookies

Ingredients

  • 6 ounces semi-sweet chocolate, chopped into 1/2 inch pieces
  • 2 tbsp unsalted butter, room temperature
  • 1 tbsp instant coffee
  • 1 cup flour
  • 2 tbsp unsweetened cocoa powder
  • 1 tsp baking powder
  • 1/4 tsp fine sea salt
  • 3/4 cup granulated sugar
  • 2 eggs, room temperature
  • 2 tbsp Bailey’s
  • 1 tsp vanilla extract
  • 1/3 cup mini chocolate chips
  • 1/3 cup chopped Andes Peppermint discs

Directions

1. Preheat the oven to 300 degrees. Line 2 baking sheets with parchment paper or silpats. Set aside.

2. In a small glass bowl, combine the chocolate and butter. Place the bowl over a pan of simmering water and stirring frequently until the chocolate has melted and the mixture is smooth.

3. In a medium bowl, whisk together the instant coffee, flour, cocoa powder, baking powder, and salt. Set aside.

4. In large bowl, beat the sugar, eggs, water, and vanilla extract until combined, about 2-3 minutes. Slowly add in flour mixture until batter is thick and smooth. Be careful not to over mix. Fold in the melted chocolate. Stir in the chocolate chips and Andes Peppermint discs. Using a medium scoop (about 1 1/2 tbsp) place dough onto prepared baking sheets. Bake until slightly puffed and the tops begin to crack, 12 to 14 minutes. Allow the cookies to cool completely on the baking sheets and serve.

Notes

  • Cookies are best the day of or next day. Store in an air tight container for up to 3 days.
  • Any type of peppermint candy will do, I just really like Andes Mints.
  • Recipe adapted from Giada de Laurentiis
Follow

Get every new post delivered to your Inbox.

Join 639 other followers